THE BEST MIMIKYU BUILD GUIDE - POKEMON UNITE
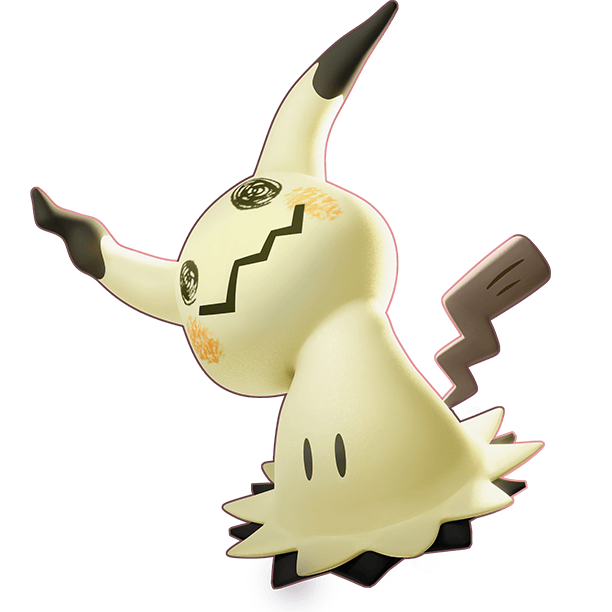
MIMIKYU
Strengths and Weaknesses
Play Rough/Shadow Claw + Shadow Sneak  /
/

Strengths
+ Shadow Sneak’s  range potential enables Mimikyu to find its way onto enemy targets from really far away and it’s shadow mark allows Mimikyu to deal extra damage based on the hp the opposing Pokemon is missing for oppressive assassinations.
+ Play Rough  is on demand, high damage, low cooldown, tracking invincibility frames for safely erasing single targets with very limited counterplay.
+ Shadow Claw  still provides still fast single target kills and powerful low cooldown sustained scrapping if you opt for that.
+ Play With Me…  functions as an alternative Slowbro Unite Move, making it extremely powerful at shutting down single targets both for offensive and defensive purposes.
+ Powerful 5 gank.
Weaknesses
– Lackluster laning phase pre 5.. assuming you lane with it.
– Needs large engages or distractions to get what it wants when people aren’t standing close to walls.
– Can’t secure.
Trick Room + Shadow Claw 

Strengths
+ Trick Room offers very high mobility and damage reduction from sources outside of it, giving Mimikyu very good potential for outplays and close range scraps.
+ Shadow Claw  offers high sustained rip damage and solid sustain to complement Trick Room.
+ Play With Me…  functions as an alternative Slowbro’s Unite Move, making it extremely powerful at shutting down single targets both for offensive and defensive purposes.
+ Powerful 5 gank.
Weaknesses
– You’re limited to your Trick Room’s  area for good output, so poorly placed Trick Rooms that get kited out leave you useless for a while.
– It’s not Shadow Sneak.
– Can be behind in upfront damage help outside of free boosted autos from casting Trick Room dashes.
Build + Gameplay
Best Items for Mimikyu – Held Items and Battle Items by Movesets
Thanks to the versatility and stat line of this ‘mon, you get a lot of options when it comes to choosing your build for Mimikyu. Both the Trick Room and Shadow build have flex spots for held items and their battle items so we’ll review the choices for both movesets.
Moveset 1 – Shadow Claw 

Items: Attack Weight  , Razor Claw
  , Muscle Band
Mimikyu has good ratios and a pretty strong level 5 gank, so getting Attack Weight  stacks is not an unrealistic task. Even if you don’t get any stacks, you’re still fairly functional, but if you do get stacks…Weakness Policy
Shadow Sneak’s  playstyle is very assassin based and Play Rough’s invincibility also makes it difficult to maintain Weakness Policy stacks. As such, Razor Claw
  is your next best bet for weaving in a bit of extra burst damage and still offers good synergy with Shadow Sneak, since it gives you a boostedattack after recasting if true comboing into Play Rough is not a concern. If running Shadow Claw, Razor Claw
 is also actually insane value.
With the recent changes to Muscle Band’s  internal cooldown being removed, Mimikyu gets considerable mileage out of with with his boosted basic attack being a double hit, meaning double procs. And with every cast of Shadow Claw granting a boosted basic, this will occur A LOT. This plays even harder into the rip and shred nature of Shadow Claw’s style, and really keeps Mimikyu relevant into bulky frontlines and objectives alike. Very high dps item now for Mimi.
Shadow Sneak  Mimikyu thrives off flanking and finding big Shadow Sneak angles, which Float Stone’s
  out of combat movement speed helps facilitate while the item itself has a fair amount of flat attack.
Focus Band  is good if you just want more general staying power, especially during laning and if it activates mid Play Rough
  , the invincibility allows you to get fully uninterrupted healing.
Weakness Policy  doesn’t do as much for Play Rough cause of the invincibility frames leading to Mimikyu timing its own stacks out, but if you do want extra damage for Shadow Claw, this is a good way to go.
If you don’t want to stack, you could consider muscle band, however given Mimikyu’s stat line we feel not stacking is leaving far too much damage on the table.
Battle Item: X Attack  , Shedinja Doll
  , Eject Button
  , or Full Heal

Lots of choices here, Mimikyu is versatile so there’s no one best build. X Attack  is a generally great call for capitalizing on the very high ratios of Shadow Claw, Play Rough, and Play With Me… to really make sure that you close out kills on your targets.
Shedinja Doll  works particularly well with Play Rough, as a decent amount of Play Rough’s cooldown can be stalled out with a well placed Shedinja Doll to chain additional invincibility frames in shorter succession.
Eject Button  offers good general playmaking to help escape tough situations or make sure that you’re in range to hit your moves, or pull a Slowbro with using Eject Button to take a key target out with Play With Me…
Full Heal’s  unstoppable ensures that counterplay related to CC or Clefable’s Gravity can be ignored once.
Boost Emblem Loadout: 6 Brown  6 White
Best blend of extra damage and survivability for a physical diver like Mimikyu.
Trick Room + Shadow Claw 

Items: Attack Weight  , Weakness Policy
  , Razor Claw/Focus Band
  /
/ 
Shadow Claw’s  fantastic scalings go very hard with Attack Weight
  .
.
Razor Claw  offers great synergy with this moveset in general with Trick Room’s
  mini dashes giving you a boosted auto + Razor Claw proc with frequent procs between Shadow Claw
  casts.
Both Charging Charm 
 are fantastic final slot options for Trick Room. Weakness Policy
  offers you even higher damage and sustain potential and Mimikyu has no problems getting stacks. If you don’t want to run full damage or stack, replacing Attack Weight for it isn’t a bad idea either.
Focus Band’s  general extra survivability is also really good for the brawly playstyle Trick Room wants to aim for. If you want to go without it, be sure to play a bit more evasive to avoid unnecessary damage or play harder to a healer.
Battle Item: Full Heal  , X Attack
  , Shedinja Doll
Because of the sustained, but mobile fights that Trick Room likes to go for, Full Heal  can be very important for making sure you can actually play the game into heavier CC matchups and make or break successful attempts at baiting out CC moves.
Shadow Claw’s great ratios go hard with X Attack  and being able to swing autos a bit faster also helps with reducing Shadow Claw’s cooldown faster.
Shedinja Doll  can be used as an alternative defensive option to help you i-frame through troublesome situations or stalling out your Trick Room’s cooldown after it ends.
Boost Emblem Loadout: 6 Brown  6 White
HP and Attack are both very relevant stats for you, so naturally you want to maximize those.
How to Play Mimikyu in Pokemon Unite
About Disguise 
Mimikyu spawns with its disguise up, indicated by its healthbar having a yellow outline and its head being propped up on its model. When Mimikyu gets hit by any instance of damage, the disguise is broken and it changes to busted form. In exchange, you take a small amount of true damage while mitigating the damage you just took and anything else incoming for the next half second.
The player that broke the disguise gets temporary a mark on it that enables Mimikyu to do 10% increased damage and movement speed when moving towards it.
50 second cooldown, but is reduced by 25 seconds when Mimikyu gets a kill. The cooldown is fully reset when Mimikyu itself gets KO’d. Especially during reset sprees, it’s very helpful to keep track of this cooldown via your icons on the bottom right corner of your screen so you know when you could afford to take an extra big hit.
EARLY GAME.. If you’re laning. 
Mimikyu in the early laning parts of the game before level 5 is a not so great character. Although Mimikyu is an all-rounder class Pokemon, it doesn’t perform well in extended fights early on. It’s secure isn’t great and it’s scrapping is overall mid without X attack. The most Mimikyu can do is go for stacks or anti stack itself. You lose to a majority of the top laner all-rounders like Buzzwole, Lucario, Zacian, Torchic, etc before 5.
As always, if you’re stacking, try to score with the smallest amount of aeos energy you can. This is especially important with Mimikyu as the extra time required to get a larger score can give your opponents the opportunity to put you in a fight you can’t win.
You’ll mostly just be trying to hold out until 5 by going for safe clears on your side or stacking. Dying is not worth any of this though. If you’re in commutation with your jungler and they’re playing something that spikes at 4, you can also ask to split the jungle to help get you online faster.
At level 5, Mimikyu becomes an absolute demon in lane now being able to beat Lucario, Combusken, Doublade, etc for mostly free. Though Buzzwole and especially Zacian still ruin you so it’s best to only engage the two when you know they’re weak and alone.
Razor Claw as an item is also a big part of your early fighting power, especially since Scratch has 2 casts. If you want to maximize your Razor Claw procs, be sure to put a 1.5 second delay between each cast of Scratch so you can get a Razor Claw proc off both of them.
Mimikyu’s Unite Move – Play With Me… 
Play With Me…  is a very powerful Unite Move, but still needs some thinking to be able utilize to its fullest. It has the same properties of Slowbro‘s Slowbeam
  , where it beats.. everything, so unstoppables and Full Heal cannot save someone from getting hit by it. Once hit, the target will be under Mimikyu’scloak and taking heavy damage while you’re given a large shield, but the target under the cloak cannot be hit by your teammates or healed/shielded by allies. If the shield given from this ult breaks, then the move ends, so be careful about using it near Umbreon with its Moonlight Prance
  Unite Move up.
Use it to dive targets with the unstoppable properties or to ensure a kill after your initial onslaught doesn’t work out, or if you want to protect one of your own squishes from the enemy assassin, you can pretend you’re Slowbro and target the diver instead to shut them down. The shields are also fairly significant when you cast this unstoppable ult, so you can also use them for a burst of extra survival or powering through CC while locking something down while putting on some good damage to the target. After the ult ends, you hop towards the direction on the movement stick you’re holding, which can further aid your fight or escape.
Focus Bands  can still proc for people getting hit by this though, so be sure to account for that since this Play With Me… isn’t that bursty as the damage is many small ticks, so this move can quite literally save a high bulk target about to proc their Focus Band if you’re not careful.
Moveset 1 - Best
Shadow Sneak + Play Rough 

The combination of Shadow Sneak’s  reach, Play Rough’s
  invincibility, and Play With Me…
  to beat unstoppables on a sure hit, this character is extremely difficult to stop when piloted well. Mimikyu can deal big damage from far away with little options for counterplay at the moment.
Play Rough vs. Shadow Claw 

Due to Play Rough’s  invincibility frames and high damage, this move is the main go-to for assassination angles particularly on low-health backline targets.
When you use this move, it causes Mimikyu to jump forward and if Mimikyu hits an opponent he’ll hitch a ride, gaining invincibility and dealing damage over time to the enemy Pokemon before jumping away to a designated direction, all while decreasing their movement speed through the duration. I
The tracking properties with high burst damage makes this move specialized at chasing down and killing more mobile and squishy targets that may be more able to escape Shadow Claw.
However, Play Rough has a 7.5 second cooldown, so you do need to be aware of when and where you are attaching to your target, and whether or not it will die from your engagement, because you do have a fair amount of downtime afterwards with little option for escape.
It also has great synergy with Shadow Sneak’s fear effect, as hopping onto a fleeing enemy’s back often means the opposing Pokemon has lost before they get an opportunity to react.
Shadow Claw’s  even lower cooldown and healing makes it better for sustained fighting without compromising that much assassination potential, which may make this move a more preferable pick when fighting a bulkier enemy comp or when you envision really wanting the group damage. You also rip objectives considerably faster with it, if that may be needed.
On the downside, it doesn’t have invincibility, tracking, and isn’t a dash which makes the move more of a commitment to jump into the fight with. Shadow Sneak and Shadow Claw still provide you lots of opportunities but this combination is much easier to punish if you misjudge your opening.
You also still want to make sure to weave in basic attacks between the skill casts in general so you can build up enough Shadow Claw stacks so the move itself also does enough damage once you cast it and auto attacks also reducing the already low cooldown of Shadow Claw by 1 second.
Shadow Sneak General Gameplay Tips and Direction 
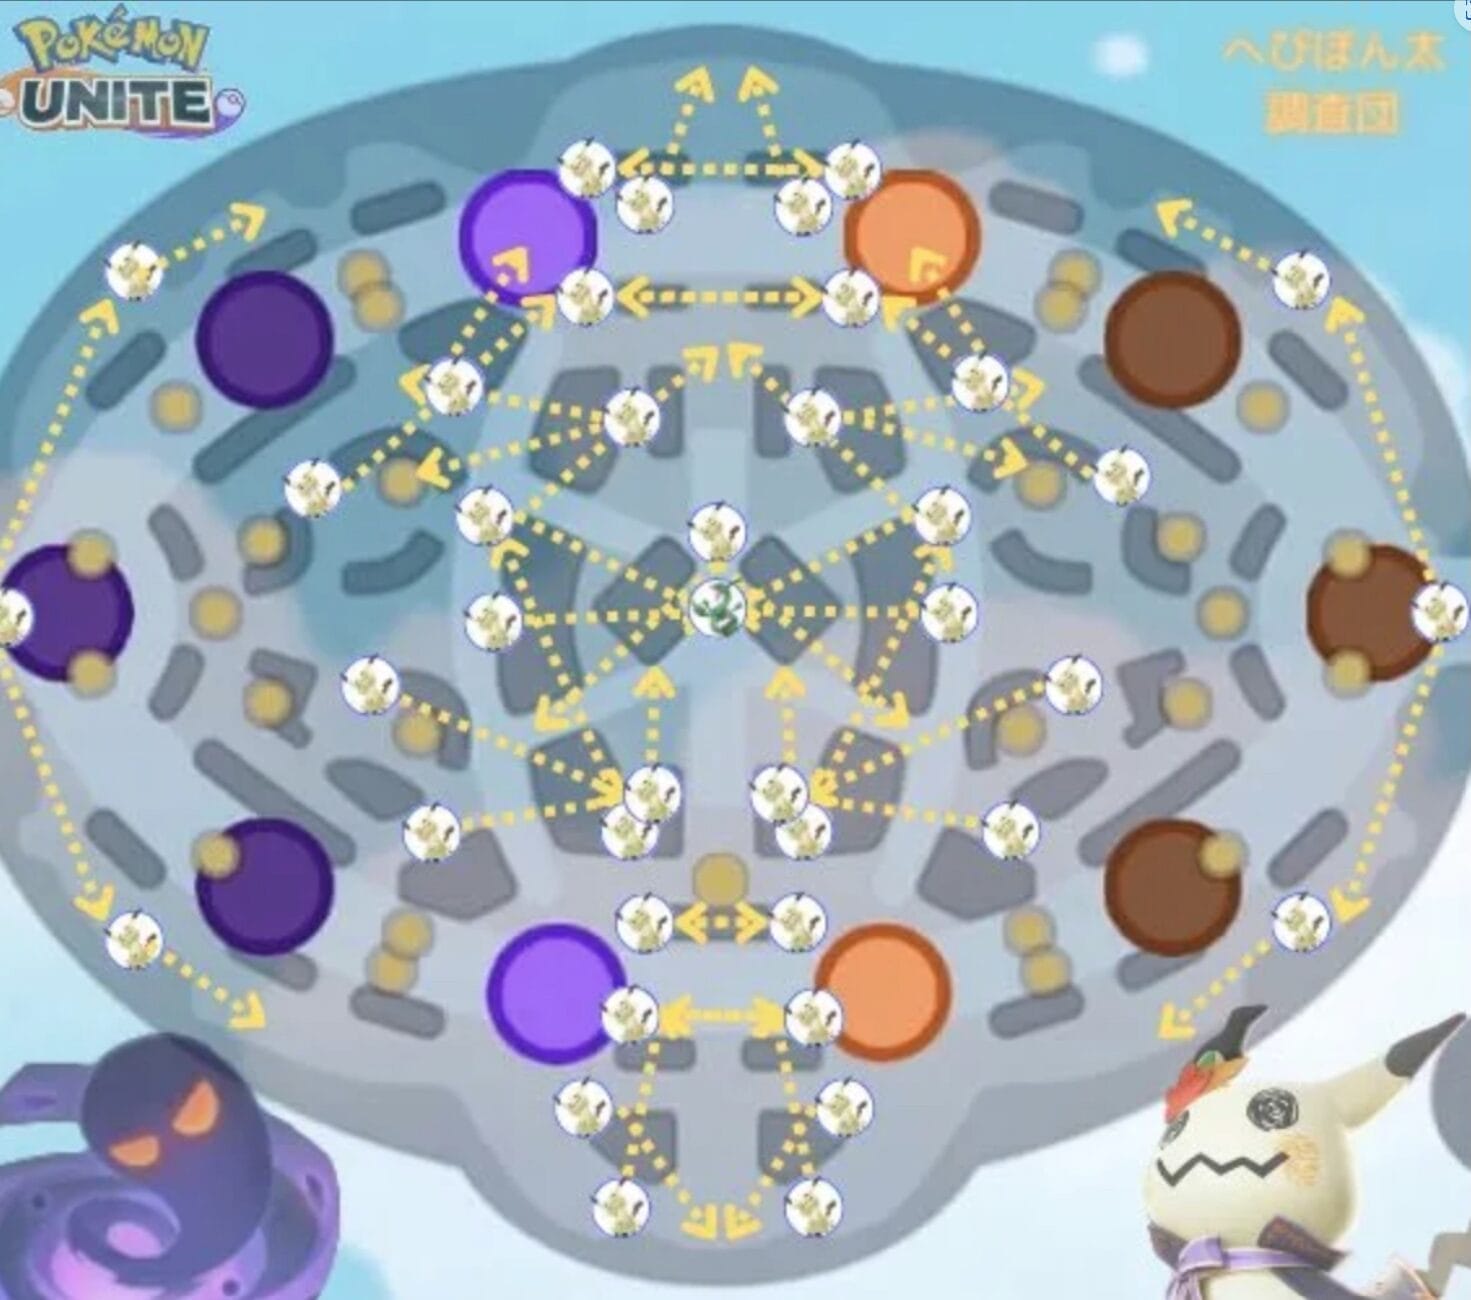
Shadow Sneak  starts out as a fairly low range skillshot, but the range of it gets bigger when going through walls and bushes. This gives you an obscene amount of threat range against people playing near tall grass and walls, so be sure to study up on your angles! When people are playing far from tall grass or a wall, you may have to be more reliant on your tanks to help set up engages for your to safely land a Shadow Sneak.
Once you land the Shadow Sneak  on someone, they are marked as a shadow target for a set amount of time which lets you do bonus damage based on the percentage of HP that the opposing Pokemon is missing AND the cooldown is reset if the target gets KO’d with it still on.
You’ll also get the option to recast it similarly to how you do with Gengar’s Dream Eater to teleport to your target, get a boosted basic attack, and do some damage to them in an AoE around them and inflict a 1.1s fear to help with comboing into Play Rough  or for general timed CC to disrupt the target’s game.
Basically, hit Shadow Sneak  , wait for your Play Rough to be off cooldown and make sure the surroundings on the Sneak Target are safe, recast Sneak to go in, then hit your Play Rough
  to delete your target off Theia Sky Ruins with little they can do to fight back. If the kill happens with the Shadow Sneak mark still on them, then your cooldowns are reset with some healing for you so you can continue the cooldown reset chain. While you’re in there, remember that you can use Play With Me…
  to help ensure some kills or for the defensive properties to unstoppable through something or utilize the shields to survive while temporarily locking down a threat.
Shadow Sneak  on hit also gives vision in an area around the target hit for a short period of time, making the move sometimes be a means of longer range vision checking. Be warned though, Shadow Sneak has a long 9 second cooldown if you whiff the move, which is a lot of downtime.
Important things that you should be doing to help you land good Sneaks and stay alive once you’re in:
– FLANK. DON’T GO IN FIRST. Your winrate will go up tenfold if you stop going in first! Mimikyu thrives in cleanup situations where people are weakened and have their CC moves on cooldownwhere it can guarantee its kills and get resets with Shadow Sneak for easy chain kills. You’re an assassin. Play like one! TARGET THE ENEMY CARRIES!
– Fire off your Shadow Sneaks  in tall grass and behind walls to guarantee yourself a bit of extra range off them, and you generally want to be playing to tall grass anyway to minimize the amount of warning time that you give enemies.
– If on Play Rough  , make sure that your Play Rough is about to be off cooldown or off cooldownwhen you get in on something with Shadow Sneak so you can get off your invincibility frames as soon as possible.
– Wild Pokemon that dies with Shadow Sneak’s  mark also resets your cooldowns, letting you use them as a mobility and healing option without much consequence. The center Baltoys are a very notable use of this, as they’re positioned by a wall for easy long range hits to be used as a mobility tool.
– Play Rough has a lot of invincibility frames and is also a dash, which lets you use it as both a general mobility tool for escaping situations or getting closer to targets for a Shadow Sneak or Play With Me…, or you can utilize the invincibility frames to dodge enemy fire and make them very tilted.
– If you’re playing Shadow Claw  , after recasting Shadow Sneak
  be sure to weave in the boosted basic attack
  you get from it to build up hits for Shadow Claw and let it do adequate damage. If you’re playing Play Rough, you can often opt to go straight into the Play Rough after the recast of Shadow Sneak to true combo into it out of Shadow Sneak recast’s fear stun.
– After Mimikyu finishes dealing damage to opposing Pokemon with Play Rough  on a hit, it bounces in the direction held by your movement stick. You can take advantage of this to dodge around more things and further optimize your chasing and positioning.
When you’re playing more of an anti assassin instead of a dive angle, you’ll still want to hang around bushes for extra range on your moves and play within arm’s reach of the carry that you want to protect from an enemy speedster like Dodrio or another Mimikyu. Use Shadow Sneak to possibly pick them off before they even get to your carry, or save Play With Me… to be used as a peeling tool once they’re closing in Slowbeam style.
A Graphic That Shows Off Some Shadow Sneak Angles:
Very Ignorant No Interaction Combos 

This wouldn’t be much of a Pokemon Unite Mimikyu guide unless we also highlighted some of our favourite ways you can ruin your opponents day while giving them absolutely no chance to play the game.
These are combos you could keep in mind when you’re trying to guarantee as much uncontested damage as you can onto a single target via Play Rough’s invincibility frames and other means of self protection.
Basic Version: Play Rough  > Play With Me…
  > Play Rough
The simplest version. The combined duration of Play Rough and Play With Me… almost fully stalls out the cooldown for a 2nd Play Rough, letting you go straight into more invincibility frames after not letting them move for 2-3 seconds with Play With Me…. Other moves can be weaved in as you see fit between moves in this combo and the unite buff with CDR also still lingers for a bit after the 2nd Play Rough, letting you get yet another round of invincibility with Play Rough soon after.
Shedinja Doll Extension Example: Play Rough  > Shedinja Doll
  > Play Rough
 > Play With Me…
  > Play Rough
Yeah.. Play Rough’s duration into a Shedinja Doll can also stall out Play Rough’s own CD for more continuous invincibility. Yuck.
Moveset 2
Trick Room + Shadow Claw 

Trick Room or Shadow Sneak? 

Especially after the recent and significant buff to Trick Room’s  cooldown, this set’s not bad by any stretch, but comes with its own learning curve and is overshadowed by the incredible Shadow Sneak
 . The main use case for Trick Room is when you’re playing into very bulky comps that you can’t easily pick out and get resets on with Shadow Sneak. Trick Room’s
  spammable dashes combined with Shadow Claw’s
  sustained fighting ability lets you perform better against those. However, your main job with Shadow Sneak
  Mimikyu is still to pick out squishies, so you’ll still often rather be playing that if an enemy backliner is a central carry holding a bulky comp’s damage output together.
Trick Room + Shadow Claw General Gameplay Tips and Direction 
Trick Room  is a dash that places down a large zone. While standing in the Trick Room, you can recast Trick Room to do a dash on a near instant cooldown to your heart’s content. Using one of these dashes gives you a free boosted auto
  , which you can weave in to help build Shadow Claw stacks and do extra damage with it in tandem with Razor Claw. You also take 50% reduced damage from sources outside the Trick Roomand slows inflicted on you are converted to speed buffs.
Be smart about how you place and time your Trick Rooms though. A poorly placed/timed Trick Room that doesn’t let you get going on your opponents can leave you useless for its entire duration and if you end up needing to use Trick Room purely for mobility to get away from something, that’s also a lot of downtime before being able to fight again.
You also still want to try to wait out enemy CC resources before jumping in and committing to a fight with the move, though if you’re confident, you can also take advantage of the mobility Trick Room offers to try to bait out an dodge enemy resources.
Shadow Claw  as a move also has its own stacks that you need to build up for it to have enough hits to do actual damage, maxing out at 4 stacks, which you can keep track of via an icon that appears in the bottom right corner of your screen with the other buff icons. Unboosted basic attacks
  gives 1, while boostedones
  give 2. Each dash of Trick Room and use of Shadow Claw gives you a boosted auto to immediately get 2 Shadow Claw stacks after use. Shadow Claw’s tiny 4 second cooldown also gets reduced by a second per basic attack hit, which means you can get REALLY spammy with this move.
Generally, 2/4 stacks is enough damage for you to be doing enough damage. Especially while inside Trick Room, you want to still be able to stay mobile with the dashes and avoid taking unnecessary hits from just sitting there and basic attacking.
As a result, your general gameflow for doing efficient damage starts with this combo if you didn’t already have Shadow Claw stacks built up: Trick Room  > Trick Room Dash
  > Boosted Basic
  > Shadow Claw
  . Depending on the situation though, you may have to focus more on staying evasive to avoid enemy moves before ripping your Shadow Claws.
From there, get creative and adapt to the situation so you can hit your enemies and not get hit yourself. Sit there and keep Shadow Clawing  because you know you can just outscrap them? Sure. Trick Room Dash again to reposition and dodge, and maybe squeeze in another boosted auto before going into an even bigger Shadow Claw? Also great.
Be sure to keep track of your Trick Room’s  duration as well, which is indicated by the blue circle counting it down around Trick Room’s move icon. You’re fairly vulnerable during Trick Room’s low downtime, so be ready to dash away as it ends or have some sort of plan for when Trick Room goes down, such as Play With Me…
  to get some big damage and lockdown on a threat to stall for your cooldown. In general though, Play With Me…
  should still be saved for making sure you get the kill on your priority targets or as a defensive tool.
If you haven’t gotten the hint already, uptime is important for Trick Room  . Every extra second can count for staying mobile enough and keeping the output up. Mimikyu is already best off as a jungler, but making sure that you get your blue buff before huge fights is a pretty big deal since the 10% CDR that blue buff provides noticeably reduces the amount of downtime between Trick Rooms. Once you reach Trick Room+ at level 13, the move’s cooldownis reduced by another 1 second and enables you to have full uptime with blue buff from Accelgor.
Matchups
Favourable Matchup:
These are Pokémon that our team has determined MIMIKYU is strong against. MIMIKYU will generally be able to shut down these opponents playstyle's or have the advantage in a one on one fight.
Unfavourable Matchup:
These are Pokémon that our team has determined MIMIKYU is weak against. These Pokémon will have the upper hand in a fight or be able to exploit MIMIKYU's weaknesses.


 +6
+6













Share This Guide: